I assume that you already know what Parflow is, otherwise you would not read these lines.
Here I’m attempting to describe the steps but more importantly the tweeks one need to do under Ubuntu.
Before that, I should acknowledge this article which was my starting point.
1) Dependencies:
2) Installation of dependencies:
TCL:
There are two options here:
- install it from the repositories: This is easy as doing $ sudo apt-get install tcl-dev and $ sudo apt-get install tk-dev. However later during pftools configuration you will run into few troubles.
- Compile Tcl from source and decide yourself where to put this. pftools will search for the tcl.h and libtcl.* files in the directories ${dir}/include and ${dir}/lib where ${dir} is either the directory provided with the option –with-TCL=${dir} or the usr and usr/local if you run configure without the option –with-TCL
Here I took the first approach. So I’ll come back on the troubles later below.
MPI:
My recomendation is to get it from the repositories. If you are attempting to install it on a cluster there should be already somewhere where the libraries can find it. In my PC I had already installed it from the Ubuntu Software Center quite sometime ago. Doing so the mpi libraries will be installed somewhere that can be found and you dont have to provide any mpi paths.
HYPRE:
After you extract the files you should go into the directory ../hypre-2.9.0b/src (in my case that was 2.9 version) and run $ ./configure. By default hypre enables mpi so this will configure hypre so that the installation files be under ../hypre-2.9.0b/src/hypre. Although in general its good not to mix the builds with the code but we keep things simple here. If you dont want mpi you need to add the option –without-MPI. After successfull completion of configure you can build by typing $ make all install. After this is completed you should see two non-empty folders: an include and a lib under ../hypre-2.9.0b/src/hypre. You can also check by running $ make check
SILO:
In a similar fashion extract the files, enter the directory and run $ ./configure –disable-silex. I had never problems with that and after a succesfull configuration the $ make all install will put the libraries and include files under the directory where you extracted silo, for example ../silo-4.7.2.
3) Installation of Parflow
Extract the zip file. Lets say this is the directory $ ../parflow.693. Go to pfsimulator $ cd pfsimulator. Run the configure command with the following options if you want clm and mpi
$ ./configure –prefix=${HOME}/Downloads/PARFLOW/parflow.693 –enable-timing –with-clm –with-silo=${HOME}/Downloads/PARFLOW/silo-4.7.2 –with-hypre=${HOME}/Downloads/PARFLOW/hypre-2.9.0b/src/hypre –with-amps=mpi1
To keep things a bit organized I had extracted all individual libraries under the directory ${HOME}/Downloads/PARFLOW/. The configure step went pretty smoothly in every attempt I have made so far.
Next to build parflow run $ make install. Under ubuntu you might get errors at the very end of the building process related to gfortran and m libraries. This is probably a bug in the configuration process and you need to edit manually the Makefile.config under the config folder. If your current directory is the ../pfsimulator do the following: $ gedit config/Makefile.config. Search for a line that starts with LDLIBS = $(LDLIBS_EXTRA) (Note this is a very long line).
-edits required in Makefile.config
In this line you may see a gfortran m. Change those to -lgfortran -lm. Further right on the same line you may see two -l -l. Those probably are the -ls that where missing. Anyway now delete them. Keep going right you may see some gfortran and m that they apart from their -ls i.e. -l gfortran -l m. Remove the spaces between them.
Save the file, cross fingers and rerun $ make install. (DO NOT RERUN .configure). If for any reason you need to rerun configure, the process will generate the buggy file and you need to edit again.
This hopefully will finish the installation of parflow successfully.
4) Installation of pftools
Enter the pftools directory. If you are under pfsimulator then do $ cd ../pftools. Run configure with the following options
$ ./configure –prefix=${HOME}/Downloads/PARFLOW/parflow.693 –with-silo=${HOME}/Downloads/PARFLOW/silo-4.7.2 –with-amps=mpi1.
Depending on the TCL installation the configuration might fail to find TCL even if the command tclsh works perfectly for you.
If configuration was succesfull ignore the following paragraph.
Force configure to find your TCL installation
To overcome this you would have to edit the configure file under the pftools directory. To understand what edits you need to do, lets first have a look to see what the scripts attempts to do:
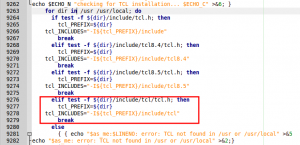
Line 9263: The script will loop through the folders /usr and usr/local and attempt to find the file tcl.h under various locations. For example under usr/include (line 9266) or usr/include tcl8.4 (9270) etc. In my case tcl.h was under /usr/lincude/tcl therefore I added an extra elseif statement which would make the configure script finding my location. My edits are highlighted in the red rectangle.
This will set the variables tcl_PREFIX = /usr and tcl_INCLUDES =-I${tcl_PREFIX}/include/tcl.
Next configure will attempt to find the tcl.so library. Below is the code in the configure script that does that
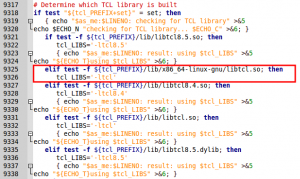
The code has already set tcl_PREFIX to a value depending where the tcl.h was found. Next will look into various folders under the ${tcl_PREFIX} to find the files with names libtcl8.4.so or libtcl.so etc. In my case the tcl.so was under the ackward folder /usr/lib/x86_64-linux-gnu. To force configure script find my tcl I added the lines in the red rectangle.
There is stil on final edit to make. Just right after the above else if statements end there is the following snippet

Note that this is how it looks like after I edited according to my needs. I just added the x86_64-linux-gnu after the lib.
A footnote here: You need to be able to locate the folders that contain the tcl.h and tcl.so files. If you are new linux user like me you migh find it very hard to track down those files. Here are few options: i)locate file ii) whereis file iii) and the best of all apt-file search file (Note that you may need to install the apt-file tool first).
After those edits you should be able at least to complete successfully the configure step.
Next run $ make install.
If make install failed during parflow building, then it is very likely that this make install will also fail. Hopefully for the very same reasons. Therefore follow the steps above. However make sure you are editing the correct file. Assuming you are into pftools folder, do
$ gedit config/Makefile.config
and make the same edits.
Rerun make install and Voila!! You just finish a local parflow installation.
5) Test
To run parflow you need to have the environmental variable PARFLOW_DIR specified. There are quite a few options about this with the simplest being every time you open a terminal run
$ export PARFLOW_DIR=${HOME}/Downloads/PARFLOW/parflow.693.
You need of course to change the path according to your preferences.
Under the ${PARFLOW_DIR}/test directory you can run a simple example such as
$ tclsh default_single.tcl 1 1 1
or try something more complicated under ${PARFLOW_DIR}/test/washita/tcl_scripts
$ tclsh Dist_Forcings.tcl
$ tclsh LW_Test.tcl
